
Cinco de Mayo Cactus: Table
Decoration
But First,
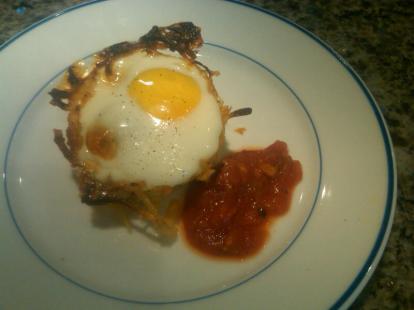
Today's Snack: Mexican Eggs in a Nest
Cooking spray
2 C. shredded refrigerated or frozen hash brown
potatoes
1 C. shredded reduced-fat cheddar cheese
˝ tsp. Mexican or taco seasoning
4 eggs
Salt and pepper
1. Heat oven to 375 degrees. With cooking spray, coat
four custard cups (8 oz.) or insides of six muffin cups in a baking tin.
2. In a medium bowl, mix potatoes and cheese. Sprinkle
with seasoning. Toss gently until mixed.
3. Divide the mixture evenly among custard cups or
inside muffin cups. Using the back of a spoon, press the potatoes against the
bottom and halfway up the side of each cup, to form a "nest."
4. Place custard cups or muffin tin on a baking sheet.
Bake for 10 minutes.
5. Remove from oven. Break an egg over each "nest" and
let it slip into the "nest." Return to oven, and bake 10-15 minutes more, until
the whites are completely set and the yolks are thick but not hard.
6. Sprinkle with salt and pepper. Some people like to
eat their "eggs in a nest" with a side of salsa or taco sauce, a big glass of
orange juice, and some fresh fruit.
--------------------
Supplies for each table decoration:
Styrofoam egg, about 3" | Modge Podge (optional)
Sponge brush | green acrylic paint OR green latex housepaint
OR water-based spray paint with a
label that says it's for Styrofoam
Bamboo skewer | bucket of clean craft sand | small stone or tape ball
Green craft wire OR green florist's wire
OR toothpicks or twist-tie wire
spray-painted green
Scissors
Terracotta colored plastic cup OR a paper cup spray-painted terracotta
color
OR a real terracotta pot, with a colorful, shiny glaze
Colorful tissue paper (orange, yellow, pink, red) | tacky glue
Raffia
Note: do this at least the day before
your Cinco de Mayo celebration so that the paint and glue are dry and your
decoration is ready to go. You might want to make one per person as a party
favor to take home. These look great on a Cinco de Mayo table with votive
candles and some Mexican items such as maracas and a sombrero as the
centerpiece.
A little background on this holiday in
Mexico: "cinco" (pronounced SINK oh) is Spanish for "five," and "Mayo"
(pronounced MY oh) is the month of May. It's not really that big of a holiday
in Mexico, but it's a fun way to celebrate Mexican pride. Cinco de Mayo honors the way the
Mexican army beat the French, even though the Mexicans were outgunned, on May
5, 1862, at the Battle of Puebla, a city in northern Mexico.
This bright, colorful craft
works as a table decoration any time, but it's extra fun to have on May 5, as
we celebrate a nice victory with Mexico. And, unlike a real cactus flower,
it'll last for years.

First, here's your chemistry lesson for
the day: most spray paints contain solvent. That's a chemical that makes
something else dissolve. If you try to spray-paint your egg green for this
craft, you'll probably make part of the Styrofoam egg dissolve because of the
solvent in the paint. Then it will look like an alien space egg that's been run
over by a tank. Not good!
So it's important to use the right kind
of paint. Water-based paint is best. So if you have some bright green latex
house paint, go for it. But more likely, you can get a tube of green acrylic
paint at a craft store fairly inexpensively.
Look for Styrofoam eggs in a craft store
on sale after Easter.
Work over newspaper to catch drips, and
you might want to wear a paint shirt to protect your clothes.
Stick a bamboo skewer in the narrow end
of the egg. If you have Modge Podge, you could put a coat or two of that on
there first, to reduce the amount of the texture that will show. Either way,
then paint the egg green. When finished painting, stick the bamboo skewer
holding the egg into a bucket of sand so that the egg can dry.
If you don't have green craft wire or
florist's wire, paint about a dozen pointed toothpicks green. Let dry stuck in
a tub of sand. You'll break them in half later, so it's OK if one end isn't
painted so that you can handle the toothpick while painting.
The good thing about acrylic paint is
that it washes right off your hands with soap and warm water. But if you get
any on your clothes, wash them immediately, because dried acrylic is impossible
to get out of fabric.
If you don't have a real terracotta pot,
or a paper or plastic terracotta color cup, then paint a small paper cup
terracotta color. Let dry.
Now let's make a cactus!
If your pot has a drainage hole in the
bottom, plug it with a small stone, or roll up a piece of duct tape between
your palms into a ball and drop it over the drainage hole. Or tape the
underside of the pot with a piece of plastic shipping tape. This is so the sand
won't spill out.
Then fill the container two-thirds full
with clean craft sand. Squeeze in some tacky glue. Press the small end of the
painted egg into the sand and glue. Let dry.
Cut pieces of craft wire and push into
the Styrofoam as your cactus "needles." Or you can break your painted toothpicks
in half and stick the toothpick halves into the Styrofoam to be needles.
Cut four pieces of different colored
tissue paper in 5" squares. Stack the four pieces on top of each other.
Accordion fold, back and forth, in 3/8" folds. Cut the ends rounded.
Cut a piece of craft wire and fold
it in half. Pinch together the middle of the tissue. Bunch and twist the
wire tightly around it. Fan out the folds of tissue. Gently pull the sheets
apart, starting at the top, and shaping the flower as you go.
Push the craft wire into the top of the
cactus to hold the "bloom" in place.
Tie a piece of raffia around the pot.
Glue in place.
Arrrrrrrriba! Happy Cinco de Mayo!


