Arms and Armor as Art
Today's Snack: In the Middle Ages all over Europe, figs and dates
were a popular snack. Try some dried figs or dates with the pits removed. Or,
if they are in season, try some fresh figs. If you can't find them in the
grocery store, you can always have that wonderful cookie - Fig Newtons! And
wash down with milk.
--------------------
Supplies:
One round or oval paper
plate
Decorative elements
(short dry noodles, beads, dry beans, hardware nuts, etc.)
Sheet of aluminum foil
(approximately 12" x 12")
Glue or tape
Rectangular strip of
cardstock or cardboard (1-3" tall and 6-9" wide)
Topic
Time Period: 600 - 1500 A.D.
Did
you know that you can find swords and armor in an art museum?
Art
museums have plenty of three-dimensional (3-D) objects to see - not just
paintings. One category of 3-D art is "arms and armor." By "arms," we mean
weapons - swords, axes and the like. By "armor," we mean protective gear and
clothing that soldiers have always worn in battle.
From
ancient times to more recently, artists have decorated the weapons and armor
that warriors wear in battle, just like a clothes designer might decorate the
hats, shirts, pants, and dresses that everyday people wore.
Some
of these weapons and armor are preserved in art museums.
Most
of the time, the decoration is made of animal designs, flower designs, and
writing.
Artists
could make weapons and armor look fancy and impressive by putting strips of
gold or silver onto them and by attaching jewels and fur.
In
the Middle Ages in Europe, a knight's equipment was usually his horse, bridle,
saddle, spurs, hauberk (a long-sleeved shirt made of chains of metal), lance,
sword, helmet and shield.
The
most important pieces for the knight's protection were probably his helmet and
shield.
Helmets
came in many different shapes. Often, scholars can identify where a helmet
comes from by its shape.
Now,
think about what you know about shields. Have you seen one in a cartoon? Have
you seen one in a movie or at a play? What did it look like? What shape was it?
The
Middle Ages, also known as "Medieval times," lasted from about 500 A.D. until
1350 A.D. During that time in Europe, there were warriors from Islamic lands who
conquered much of Europe. These warriors usually had metal shields that were
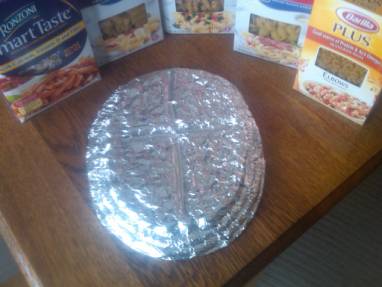
round. You can make your own metal round shield. Here are the steps:
1. Take a round paper plate and
decorate the bottom side (the side that touches the table) in 3-D by gluing
small decorative pieces onto it. For example, you could glue dry macaroni
noodles around the edge to make a border.
Or, try making an initial by forming the first letter of your name with
beads. Many medieval soldiers had crosses on their shields, thinking that the
Cross of Christ would protect them.
2. Wait for the glued decoration to
dry.
3. Next, get a piece of aluminum foil
that is bigger than the paper plate. Line up the center of the foil over the
top of the center of the paper plate. With your fingers, press the foil down
and around the glued decoration so that it fits snugly around the decoration.
You should be able to see the decoration popping up under the foil (but be
careful not to make any holes in the foil).
4. Once you have pressed down around
all the decoration, fold the edges of the foil onto the other side of the paper
plate, so that you have a circular shield. Glue or tape the foil to the back of
your shield so that it stays in place.
5. Make a hand grip for your shield.
Cut out a small rectangular strip of cardstock or cardboard, about 1 inch tall
and 6 inches wide. Make a flap on each side of the grip by folding the ends in
about one inch.
6. Put your shield face down on a
table, with the top of the shield pointing up. Glue each flap of the grip onto
the back of the shield so that when you hold the grip, the shield protects your
arm.
Enjoy your shield as a
thing of beauty. Some kids like to play with them, and that's OK, too. Recognize
that if you were a warrior back in the Middle Ages, it might save your life,
and that would be beautiful, too!


