
Drawing a Pony
Today's snack: Pony Food! Put these three things
on a plate in front of you: shred one square of Shredded Wheat cereal into a
pile of "hay" . . . three baby carrots . . . and one-half cup of sweet granola
in a small bowl. Now eat it like a pony! Hold your hands behind you, and munch
your three pony treats just like a pony would. Neighhhhh!!!
------------------
Supplies:
Gather together tracing paper, unlined drawing paper, a
sharp pencil and an eraser.
One of the
most popular subjects of all children's literature and children's art is the
pony. No wonder: they're cute, they're kid-sized, and they're endlessly
fascinating.
Would you like to learn to draw a
pony? You know what they say: imitation is the sincerest form of flattery. So
let's look at a photograph of a pony, and draw it on a separate sheet of paper.
First, look at this photograph. Consider the three major
shapes that you see:
- a triangle (the neck and
shoulders)
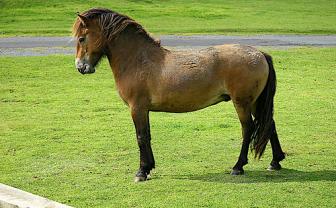
With light, loose, relaxed strokes, draw the biggest shapes
of the pony's body - the body, the neck and shoulders, and the head. Check your
drawing against the photograph to see if your shapes are in proportion to the
real thing. Is the body of your pony too fat? Too thin? Too long? Too short?
You can erase and correct the shape. Do the same with the neck and shoulders,
and the head.
When you are happy
with the main shapes of the pony, add the legs, following the same process of
erasing and re-drawing, until you are happy. Notice how the horse's "knees"
bend backwards, not forwards the way yours do.
Then add all the other fun details that make a pony a pony -
ears, forelock, nostrils, muzzle, mane, hooves and tail. You don't have to have
the legs and tail in the same position as this picture, unless you're trying to
make it look a lot like a silhouette - an outline drawing of a
three-dimensional object, in this case, the photo of the pony.
How do you like your drawing? Is it
suitable for framing? Or at least, putting up on your refrigerator? Try it
again, using colored pencils this time. Then try thin markers or watercolors.
Experiment! Try it over and over, with different materials, until you find the
look you like.
Then
try a second drawing, zeroing in on the pony's face. Ponies have such
expressive, beautiful heads that it is important to get the lines of the pony's
head just right.
Here is a picture of a pony's head.
Study it to see how much of the head is made up of curving or circular lines,
some short and some longer.
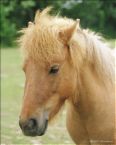
Hold your pencil on top of this picture and
"rehearse" how you would draw some of the lines. Don't press down with the
pencil point; just imagine how you would draw those lines.
Then move to a piece of blank paper and begin by
drawing the outline of the nose - the vertical lines that form the long front
of the face.
Keep drawing small, light, circular lines to
bring in the other structures of the head, including the eye areas, ear areas, mane,
fetlock, cheeks and muzzle.
Add shading, and erase any unwanted lines, to
give your drawing a three-dimensional look.
How do you like it? Pretty good, huh?
Maybe someday you can become an artist and draw
horses or other fun things for a living!